How the firmware updates work on Toyota Touch & Go

Before I start, here’s the TL;DR: Custom firmwares are not possible for Touch & Go without breaking open the device and possibly soldering stuff on it. Don’t try it - you’ll most probably ruin your device.
Now that we have that out of the way, let’s continue.
Out of curiosity, I wanted to find out what’s lurking inside the Touch & Go unit I have on my car. The device itself reveals very little information about its internals, but a firmware update image provided by the manufacturer was a great source for lots of interesting information.
As has already been determined, the head unit runs the QNX Neutrino operating system. The board appears to be based on a TI DM3730 (OMAP3 ARMv7) SoC and all the radio, navigation, etc. functionality is provided by a Toyota-specific extension box which may be running a Renesas V850 and a firmware of it’s own.
The board has a NAND flash chip which is divided between IPL, IFS and ETFS partitions. The first two are read-only and loaded into RAM on bootup. The ETFS is a read/write filesystem, so the updater scripts can delete, replace and add individual files on it.
Additionally, an MMC card (probably not a physical card, though) is mounted on
/fs/mmc0/ifs for system data.
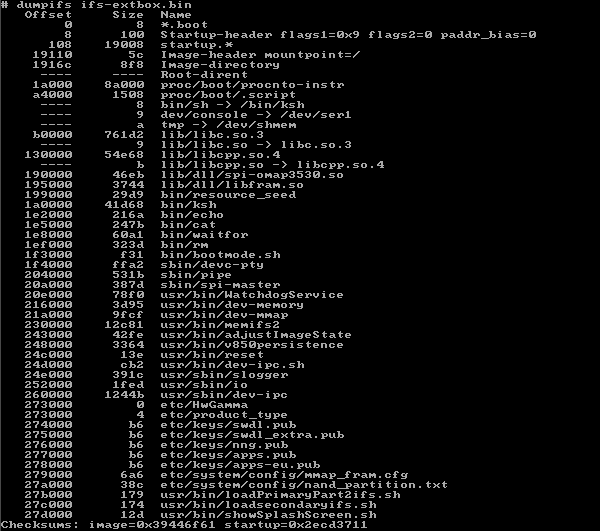
Updating the device completely replaces the IPL and IFS images in the onboard NAND, so looking at
/usr/share/IFS/ifs-extbox.bin in the ISO image probably lets us see something close to what’s currently on the device’s IFS.
Dumping the IFS image reveals a bunch of interesting stuff, such as the boot scripts, validation keys and various ARM binaries. So let’s take a short look at what happens when the device boots up for updating.
On powerup, the execution starts from the IPL, which is something akin to the BIOS and MBR on PCs. The IPL locates the system image, loads the process manager (procnto-instr) and transfers control to it, which then continues the boot process by starting the boot script off the IFS.
The boot script first starts several system services and then calls another script called
/bin/bootmode.sh. This script first reads the FRAM at offset 3 and checks whether the byte contained there is ‘U’. If true, the system is determined to be in update mode.
inject -e -i /dev/mmap/swdl -d /tmp/bootmode -o 3 -s 1
The update package is expected to be delivered on an USB mass storage device, so the boot script waits up to 10 seconds for /fs/usb0/swdl.iso to appear. Once found, it will proceed to authenticate the ISO image.
It first calculates an SHA256 digest from the ISO image and stores it into /tmp/swdl.iso.digest. The utility isodigest apparently either ignores the first 64 bytes or just regards them as zeroes. We’ll assume the latter.
isodigest -df /tmp/swdl.iso.digest /fs/usb0/swdl.iso
Once a digest has been made, the signature is extracted from the beginning of the ISO image. The first 64 bytes contain the signature and it’s stored into /tmp/isodigest.sha256.
inject -e -i /fs/usb0/swdl.iso -f /tmp/isodigest.sha256 -o 0 -s 64
For example, signature on swdl.iso for 2011-12-08 update:
00000000   77 82 f9 9a 16 d6 57 c0 0a 88 3a 16 78 e1 d7 c2
00000010   65 48 7f 61 2a 7c e8 b6 e7 f8 b1 45 64 04 8d b9
00000020   9f 21 95 39 69 6c dc d3 70 97 d9 3b b1 89 e2 22
00000030   35 a5 69 9d f3 91 e9 e5 32 78 7e 29 2f 36 a0 51
The startup script will then scan all .pub files stored in /etc/keys/ on the IFS. Currently there are five public keys in PEM format:
274000   b6   etc/keys/swdl.pub
275000   b6   etc/keys/swdl_extra.pub
276000   b6   etc/keys/nng.pub
277000   b6   etc/keys/apps.pub
278000   b6   etc/keys/apps-eu.pub
The script verifies the signature against each public key. If the calculated digest matches the signature (ie. the ISO has not been tampered with and the signature has been signed with one of Toyota’s private keys), the script returns “Verified OK” and environment variable AUTHENTICATED is set to 1. If after processing all keys the variable is blank, the script will quit with an error.
Authenticating is done by calling OpenSSL with the following command line for each key in
/etc/keys/:
openssl dgst -sha256 -verify /etc/keys/____.pub -signature /tmp/isodigest.sha256 /tmp/swdl.iso.digest
If authentication went OK, the ISO image is mounted and the IFS image on the ISO is loaded to RAM. This secondary IFS contains all the system executables required for the actual update process.
memifs2 -q -d /fs/usb0/usr/share/swdl.bin /
Unfortunately swdl.bin is not a standard IFS image, but instead appears to be some (loosely) compressed format with a ‘hbcifs’ header. Apparently it is decompressed and loaded into RAM by memifs2, but there’s no documentation available for this utility. Finding out more about the ‘hbcifs’ format would potentially require disassembling /usr/bin/memifs2 provided on the primary IFS.
Finally, with the secondary IFS loaded, bootmode.sh turns over control to another script,
/usr/share/scripts/install.sh on the ISO image. This script then continues the update process by flashing the new IPL and IFS images and modifying the ETFS and MMC filesystems. The lua scripts used for this are plainly visible on the ISO image.
Of course, without knowing one of the private keys Toyota uses to sign the images, it’s impossible to make custom firmware images. The only way around this would be to somehow inject our own public key to /etc/keys/ by modifying the IFS partition on the NAND. The most common way to modify NAND contents in other devices is by opening the device and reflash using possible JTAG pins inside the unit.
Although JTAG headers are ubiquitous on embedded systems, it is very possible that a production device only has solder points without actual pins. In this case we’d have to modify the board by adding the pins in order to be able to use a programmer device.
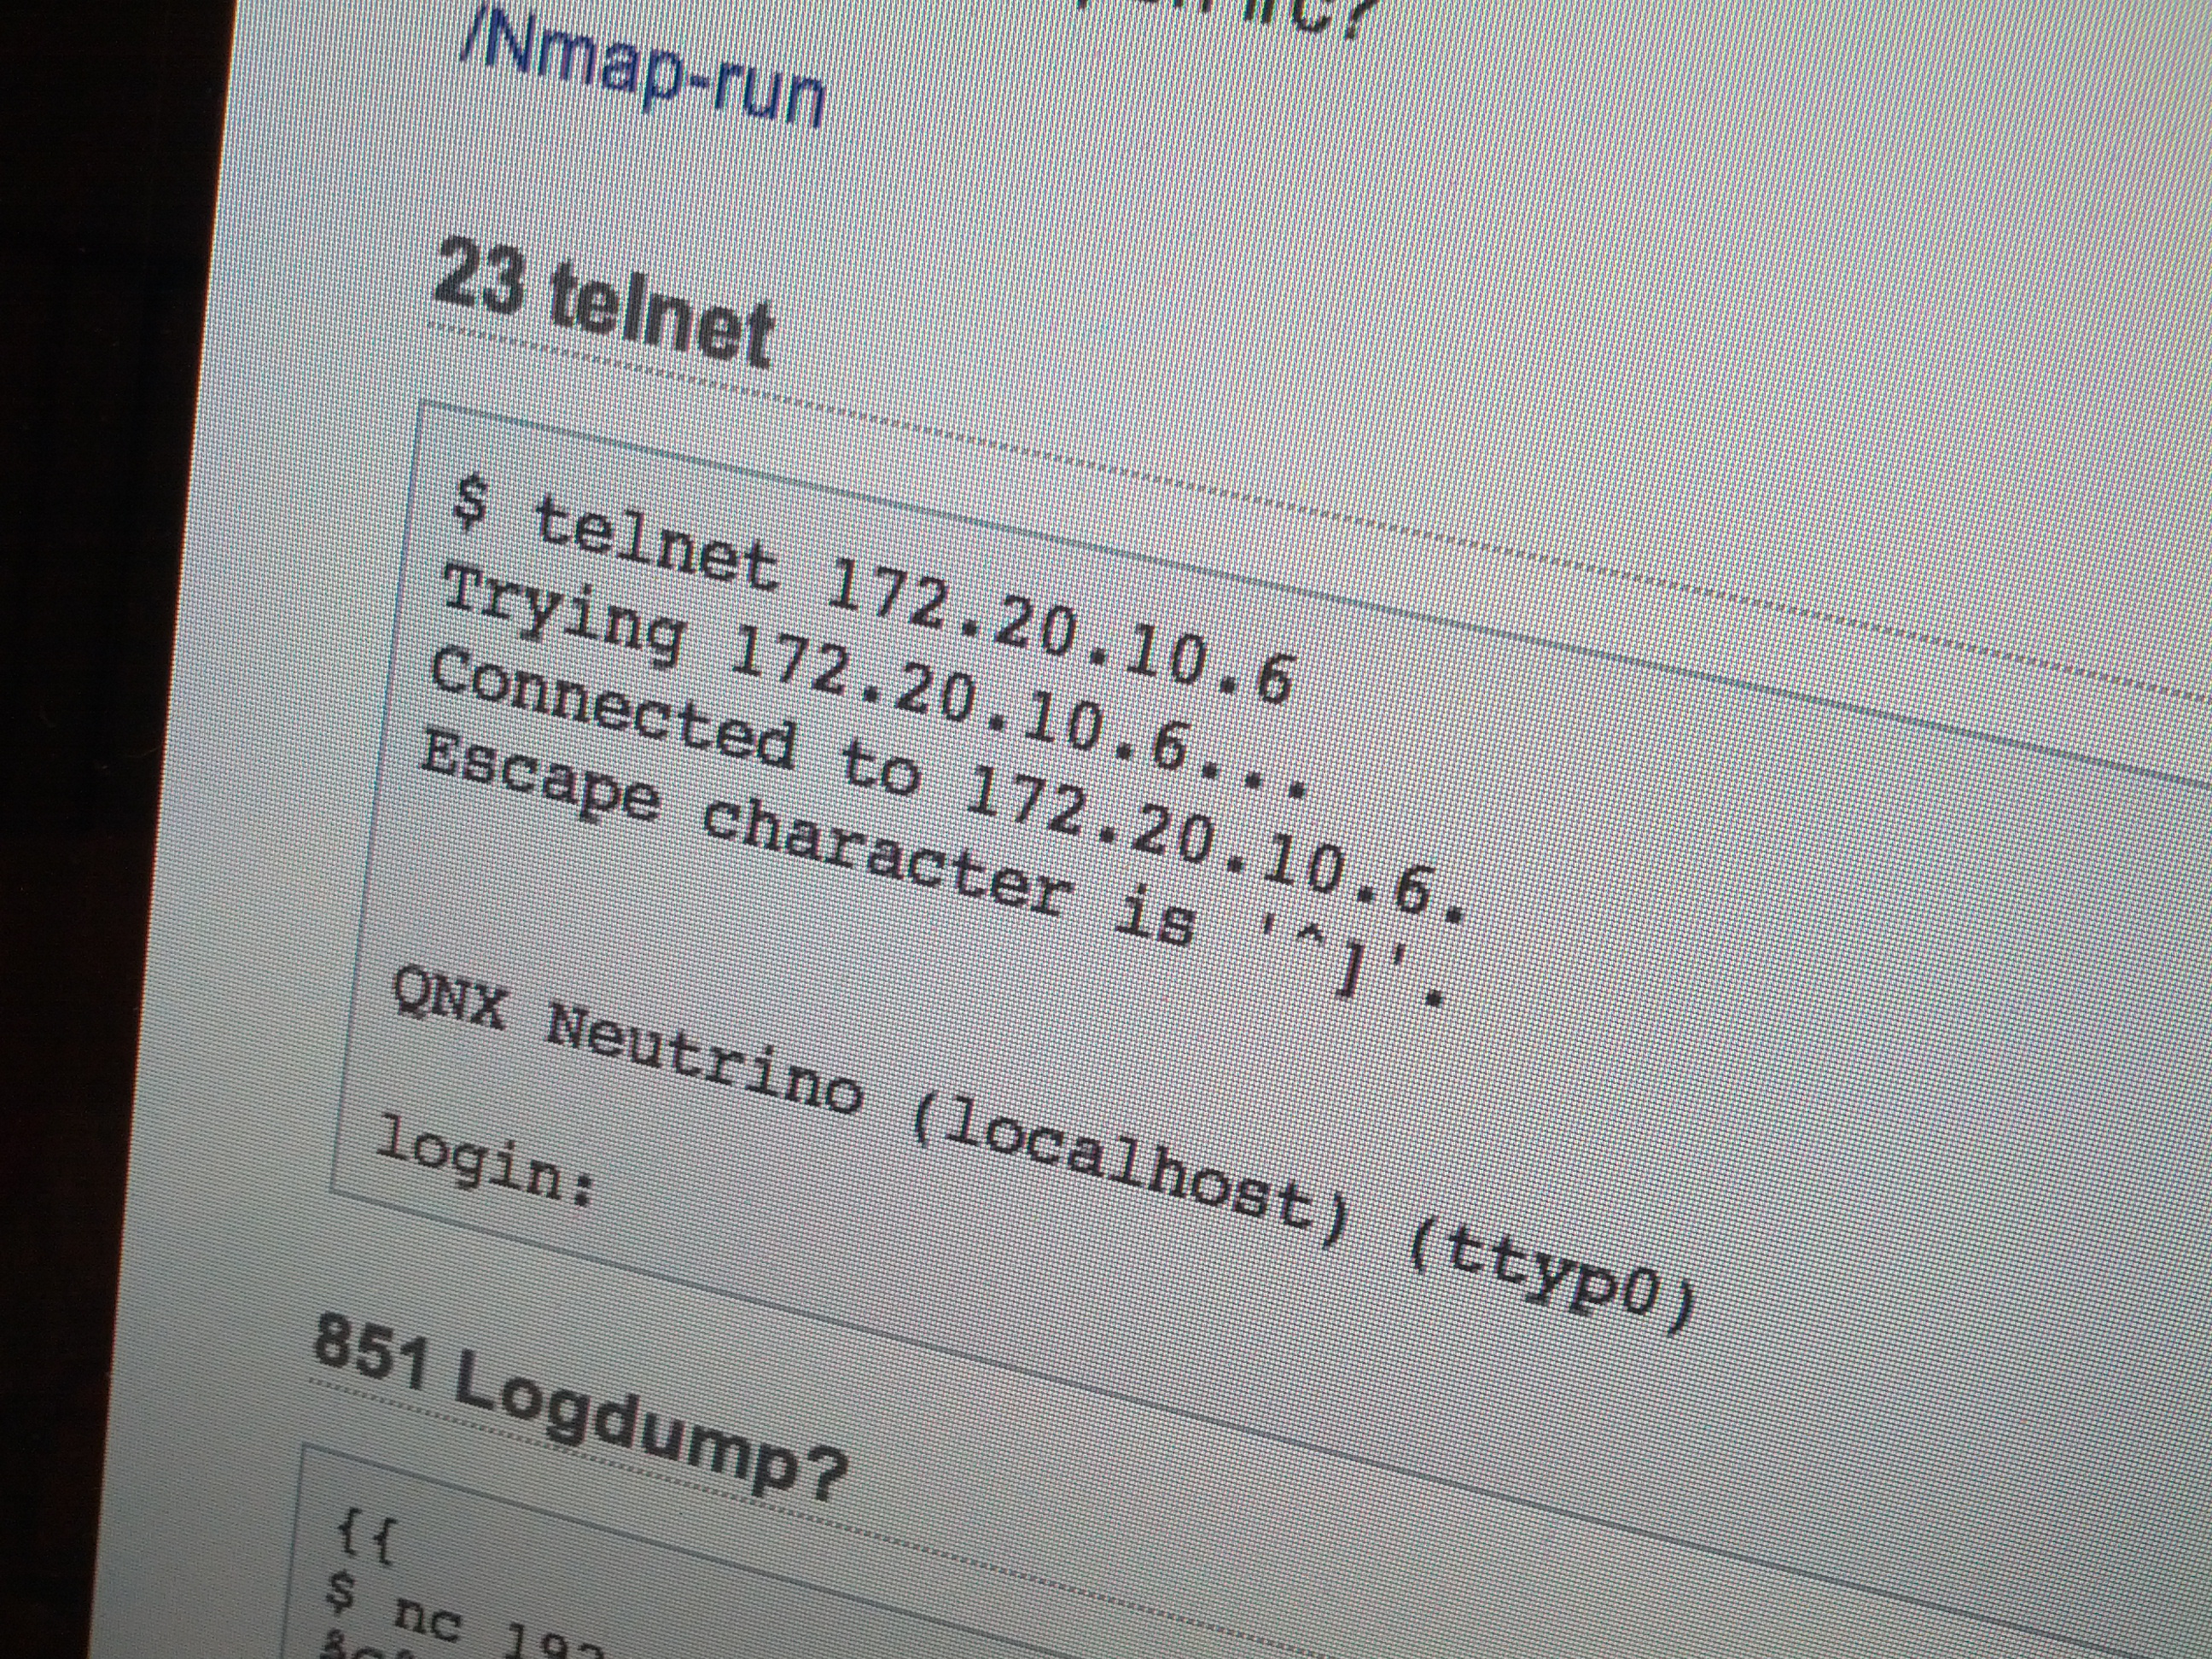
An alternative to flashing via JTAG is getting shell access on the device via TCP/IP and reflashing the IFS using the built-in tools on the device. The folks at Tarlab Oulu have discovered that the device has an open telnet service on port 23 and presents a login prompt. If a username/password combination for logging into shell with root access is found, the device is open for flashing any images from mounted USB storage devices.
Given the hypothetical situation that we have found the capability to inject our own public key into the system, we could do this by first generating a key pair using OpenSSL:
openssl genrsa -out private.pem 512
openssl rsa -in private.pem -out public.pem -outform PEM -pubout
Now, assuming that the isodigest utility regards the first 64 bytes as zeroes, we need to first zero out them on our custom update image:
dd bs=64 count=1 if=/dev/zero of=custom_swdl.iso conv=notrunc
Now generate the signed digest from our custom swdl.iso:
openssl dgst -sha256 -sign private.pem -binary < custom_swdl.iso > signature
Finally, overwrite the first 64 bytes of the ISO image with the signature:
dd bs=64 count=1 if=signature of=custom_swdl.iso conv=notrunc
Now, assuming that we have somehow managed to inject our public.pem to the device as, for
example /etc/keys/custom.pub, our custom swdl.iso should pass the validation in the update script.
However, given the number of uncertainties and assumptions, the above procedure is pretty much academical and, with a high probability, would not work. Further research would require hands-on experimentation on an actual ARMv7 platform, such as the BeagleBoard-XM, which is also based on the DM3730.
While this little research project didn’t result in a procedure for custom firmwares, it was certainly interesting to see how a modern embedded device, similar to mobile phones and game consoles, performs firmware updates securely even when the user has physical access to the device. I tip my hat to all hackers who have successfully discovered ways to jailbreak their various devices.